
An in-depth look at designing and building a rotatable knob control found on most audio devices and interfaces.
Native iOS controls are almost always preferred when building a user interface. However, sometimes making a custom control is bound to happen. Since the native knob control doesn’t exist, we will make one in this blog—an example of how a knob looks is displayed below.


Knobs are commonly used in audio processing software because they are found on almost every piece of real-life audio equipment, such as effect modules, synthesizers, etc. They are also a very compact type of control because they don’t take much space while maintaining the descriptiveness of the value they hold. In this blog, we will make a knob control, as displayed below.

So, let’s get started!
Project setup
First, here is the knob image for working purposes.

In this blog, we will be writing the UI programmatically, and we will be using the SnapKit library for writing constraints. The SnapKit library can be installed via SPM, CocoaPods, or Carthage.
Create a new Xcode project with Storyboard as interface and Swift as language, paste the knob image into the Assets, and create a new file named RotatableKnobView.swift and paste the following code.

Don’t worry; we will be writing in this class soon.
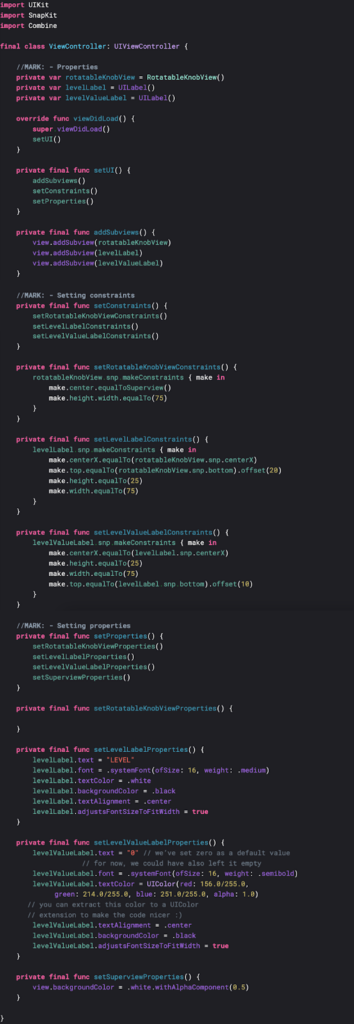
Inside the ViewController, we need to add an instance of the previously defined RotatableKnobView class, add two labels (one for title and one for value display), and configure their constraints and properties. One of the preferred ways to do this is to make separate functions for each of these tasks and then call them in the viewDidLoad method. Here is the basic configuration of the ViewController.
After building the app, we are going to get something like this.

Which means that it is time to make our knob control.
Rotatable Knob
So, we need to make the aforementioned knob image rotatable and relay the rotation values as some kind of percentages. The knobs usually rotate in the clockwise direction to increase the value (and in the counterclockwise to decrease the value). The end position looks as if the initial position was mirrored. In a mathematical sense, the maximum value of the rotation would be 270 degrees.

For rotating purposes, we are going to use the CGAffineTransform transformation matrix. CGAffineTransform is a super awesome tool for animating things and transformations in general (scaling, skewing, rotating, etc.), and it doesn’t affect the constraints set beforehand. Also, the CGAffineTransform can be used on almost every kind of view!
One thing that happens during the rotation is that the axis of the view changes, which means that interacting directly with the view being rotated may produce some unwanted results during pan/swipe gestures. Since we will be using a pan gesture to interact with the knob, we have to make a workaround here. In our case, we can make a clear overlay view on top of the knob and add a pan gesture recognizer to it. Depending on the speed of the pan gesture, the knob underneath is going to rotate. Let’s start with the basic setup of this view.
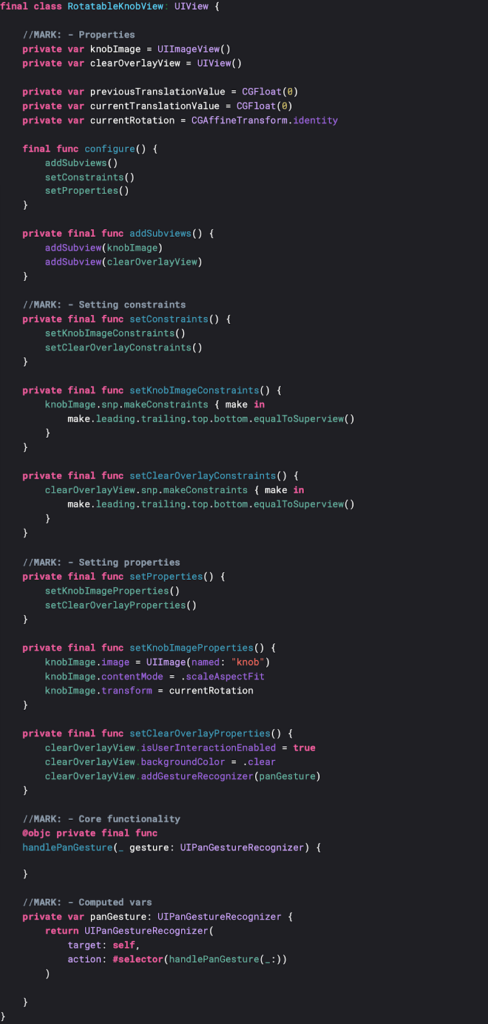
Also, add the following line to your ViewController setRotatableKnobViewProperties function.

If you have never used CGAffineTransform, the .identity value is the default transformation value of the view. It is very useful when reverting the transformation to the initial value. We have to store the previous value of the pan gesture to determine which direction the user is panning into.
Now, let’s start with the rotation!
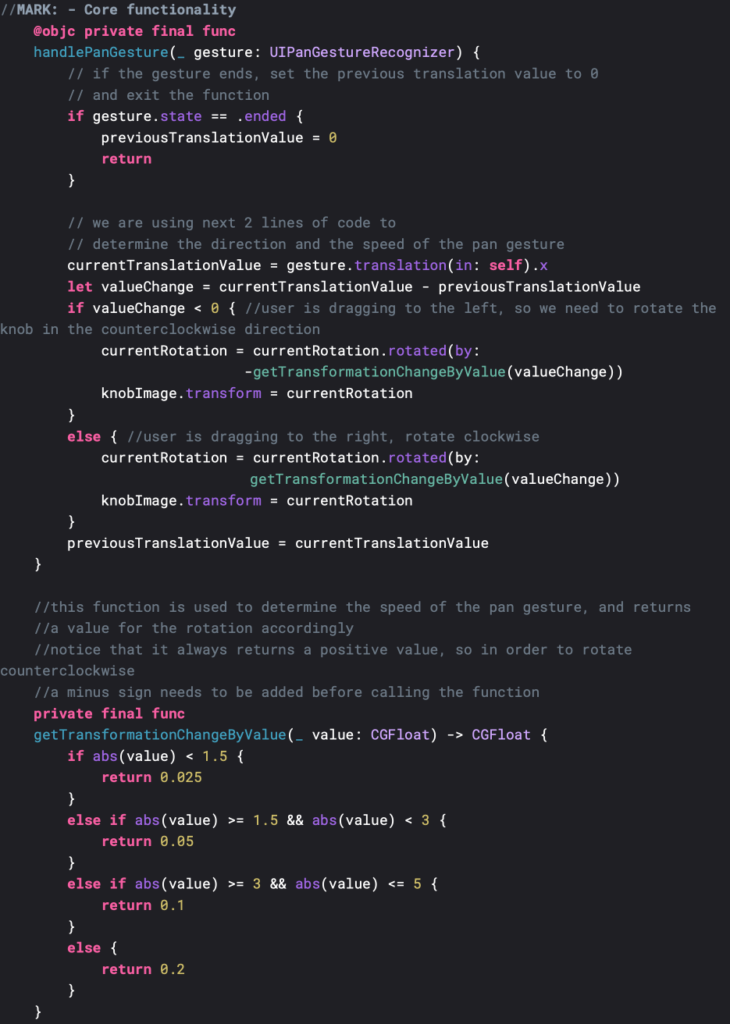
Now, this works alright, the rotation indeed happens correctly in both directions and at different speeds depending on the user’s interaction. However, the rotation doesn’t stop at the 0 and 270 degrees mark, which should represent our start and end position marks. For this purpose, we will introduce a property wrapper that handles this.
Clamping the rotation with a property wrapper
Property wrappers are a great feature. They allow us to inject a layer of additional logic that is being checked every time the value (that is being wrapped) changes. What’s really cool about them is that you can still use the value inside directly without needing access as a subcomponent of the view (which would happen if you made a generic class/custom class). Property wrappers are widely used in the SwiftUI framework (@Published, @State, @Binding, etc.). They also enable us to move the checking logic into a separate entity, which makes the code look cleaner.
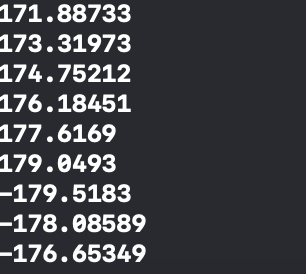
In our case, we will be using a property wrapper to clamp the transformation value to 0-270 degrees. If we print out the currentRotation value during the pan gesture handling, we get values such as this:

What we can notice is that the a,b,c, and d parameters of the transformation matrix are changing on each rotation cycle. So, we need to somehow transform these values into a value that accurately represents the rotation of our knob. We are going to do that via this extension variable:

This function returns us the rotation degrees of the transformation; however, there is a little problem that we need to solve here. If you print out the currentRotation.rotationAngle during the pan gesture, you will notice that the values around 180 degrees shift into negative values.
Luckily for us, another representation of the rotation angle will come in handy when normalizing values: the representation of angle in radians.
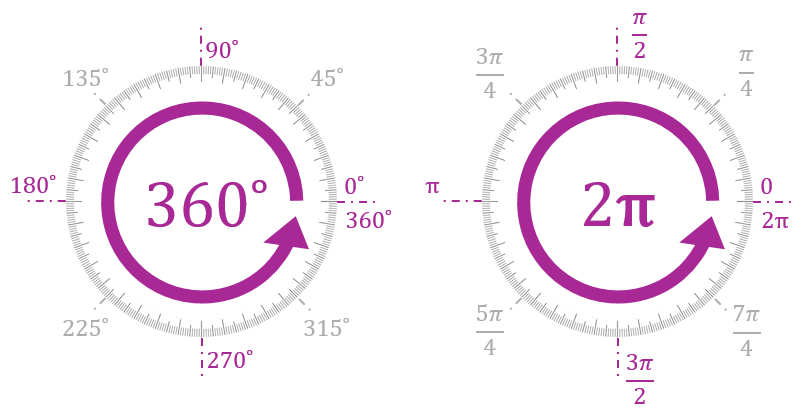
And that makes our rotation limits from 0 to (3 * π) / 2 (~4.712). Now we can introduce our @ClampedKnobTransform property wrapper.
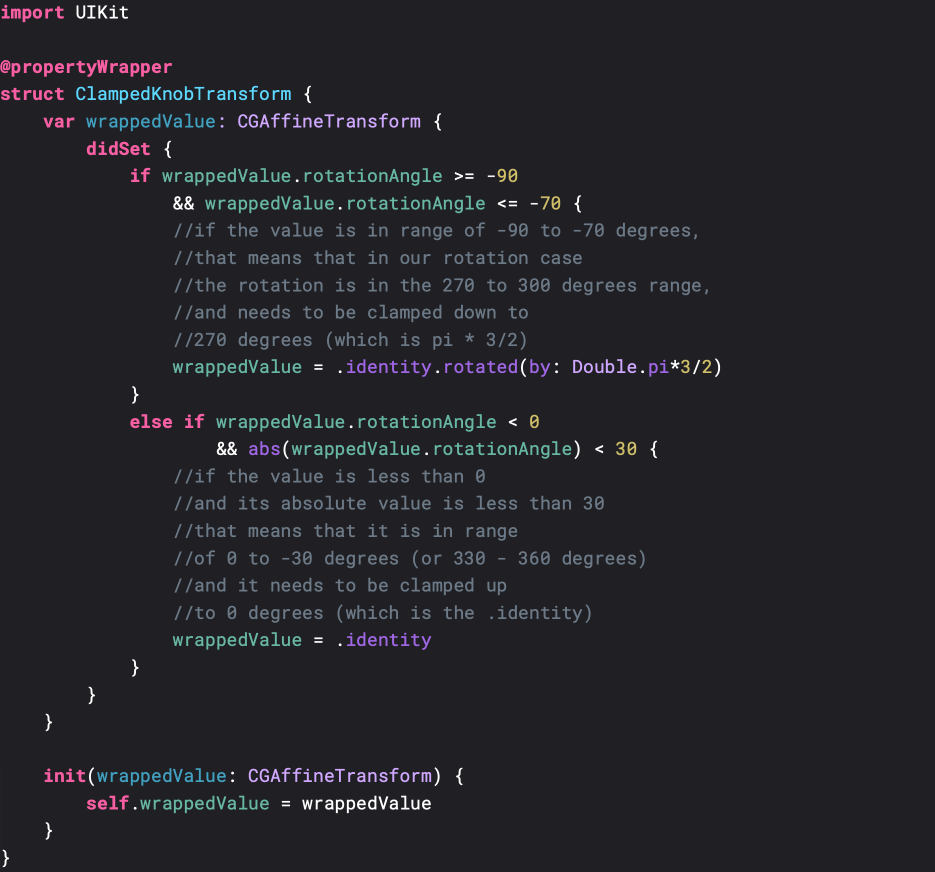
And we can wrap our currentRotation with this wrapper so that it is always clamped correctly.

Now our knob control works as intended. The only thing left to do is to relay the values inside the class back to the ViewController.
Relaying the values via Combine
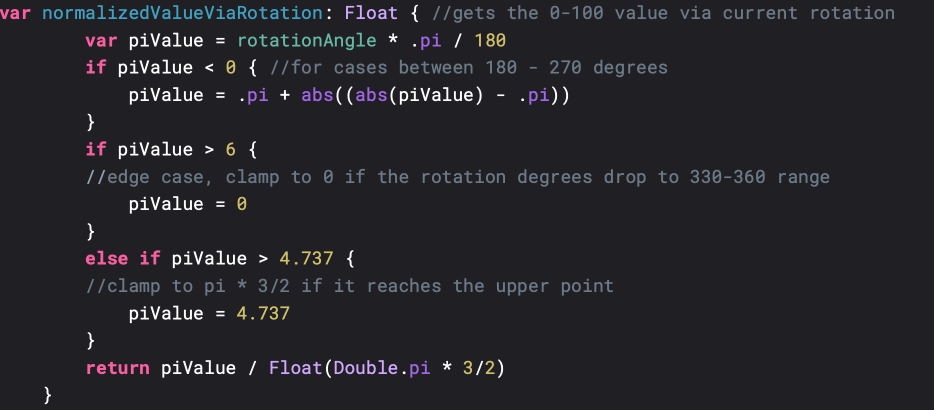
In this example, we will use Combine to send back the values from the RotatableKnobView to the classes containing its instance. The protocol-delegate pattern could also be used here, but using Combine makes it easier to debounce/throttle values if needed. Since the RotatableKnobView class doesn’t know what kind of values the outer class needs (is it a range of -5 to 5, 0 to 100, 20 to 1000, etc.), we will be returning normalized values that range from 0 to 1 (0 being the 0 degrees rotation and 1 being the 270 degrees rotation). An extension variable of CGAffineTransform that does this is displayed below.
Now that the converting function is in place, we all need to create a publisher that sends the values back. For this, we will be using the Combine PassthroughSubject. If you’ve never used Combine, here’s a quick explanation:
Combine is Apple’s framework for working with values over time, or simply put, and it is a publish-subscribe pipeline. Publishers publish values, while subscribers that are subscribed to them get these values and process them in their own ways. The Combine uses operators for the value processing/transforming tasks (some of them have already existed before Combine – map, compactMap, filter, etc). The main idea of Combine was to replace all of the different paradigms used in Swift programming before and unify them into one framework. Some of these patterns are
- Observer pattern
- Protocol-delegate pattern
- Callback pattern
- KVO
Subjects in Combine can publish values and be subscribed to, making them a good replacement for the protocol-delegate pattern in this case. They also allow us to call debounce/throttle operators, which are helpful in many cases. To create a subject, we can declare it as mentioned below.

The first generic type of the PassthroughSubject (in our case Float) represents the type of values that will be published. The second one is mostly always Error or Never, which depends if the subject will ever throw errors. In our case, we are sure that our subject will never throw errors, so we declared the error type as never (this will come in handy later).
Note that we are marking the value subject as private because we don’t want the possibility of values being published from an outside source. Still, we want to subscribe to the subject to get its values sent to the outside source, so we need to declare a publisher, as shown below.

We are using the eraseToAnyPublisher() to type-erase the publisher since AnyPublishers are the easiest to handle (you can read more about different types of publishers in Combine if this is your first encounter with Combine).
Inside the RotatableKnobView, the subject has to publish values whenever the rotation of the knob control changes. We can add this publishing behavior in the didSet property observer of the currentRotation variable.

Now that we have configured the value publishing, we have to subscribe to the knob publisher on the ViewController side. To do that, we must first declare the following property in the ViewController.

Combine cancellables basically hold the subscriptions to various publishers. If we don’t store a subscription into a cancellable, then nothing will happen once the subject publishes its values. This mechanism also absolves us of the responsibility to cancel subscriptions when the view controller needs to be released from the memory, which isn’t the case when using some mechanisms such as Observer Pattern + Notification Center.
Now that we have our cancellables, we need to define a subscription function, which we will put at the beginning of the setRotatableKnobViewProperties function. In this function, we will assign the rotation value to the levelValueLabel‘s text. In order to do this, we can use two functions that serve as the end of the Combine publish-subscribe pipeline, one of them is sink, and the other one is the assign.
Sink
Sink comes in handy when you need to call a function or if you want to run multiple statements when the value is received. The most basic example is shown below – we convert the received value to a string and assign it to the text property on the levelValueLabel.
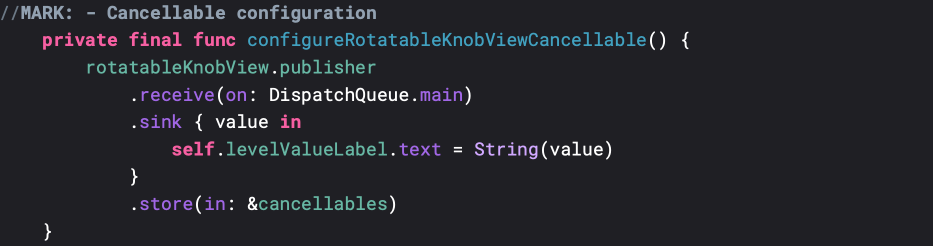
The closure inside the sink will be executed every time we receive the value from the publisher. We are also using the .receive(on: DispatchQueue.main) operator to force the execution of the closure on the main thread, which is needed when doing changes on the UI. The example above is not perfect for the sink since it only does one thing – assigning a value to a text property. This can be simplified by using assign.
Assign
The assign operator is very compact to use when the only responsibility of a subscription is to assign the received value to a property of some sort. In the example below, we will map the values received to the 0-100 range and then assign them to the levelValueLabel‘s text.

First of all, we are mapping the received value with the map operator. We multiply the value by 100 and round it up with the Int cast, and then at the end, we convert it to String so that it can be assigned to the levelValueLabel‘s text property. After that, we are switching to the main thread with the receive on the operator. Now that we are on the main thread, we can assign the value to the text property of the levelValueLabel, and at the end, we are storing the subscription to our cancellables set.
Making custom extension variables is a way to make the map function a bit nicer and more readable. Since the incoming value is of type Float, we need to declare a Float extension.

Now that we have abstracted the logic into the extension, the whole function will look like this,

and sometimes you can use the keypath version if it matches the keypath type on the assign.

You can also separate the aforementioned extension into two parts (like var asPercentage and asString) and then chain them together to gain more control over the type transformations.
NOTE: Don’t forget to use the store(in: &cancellables) after sink/assign since the written code will never be executed (the compiler will also warn you with the Result of call to ‘assign(to:on:)’ is unused message)
Weak assign and weak self extensions
You might have noticed that we have retained the self strongly in the previously mentioned sink example. Unfortunately, sink and assign produce memory leaks in this way, and we have to handle them on our own. One way to solve this problem is by doing the [weak self] – guard let self “dance”, but another extension comes in handy here.
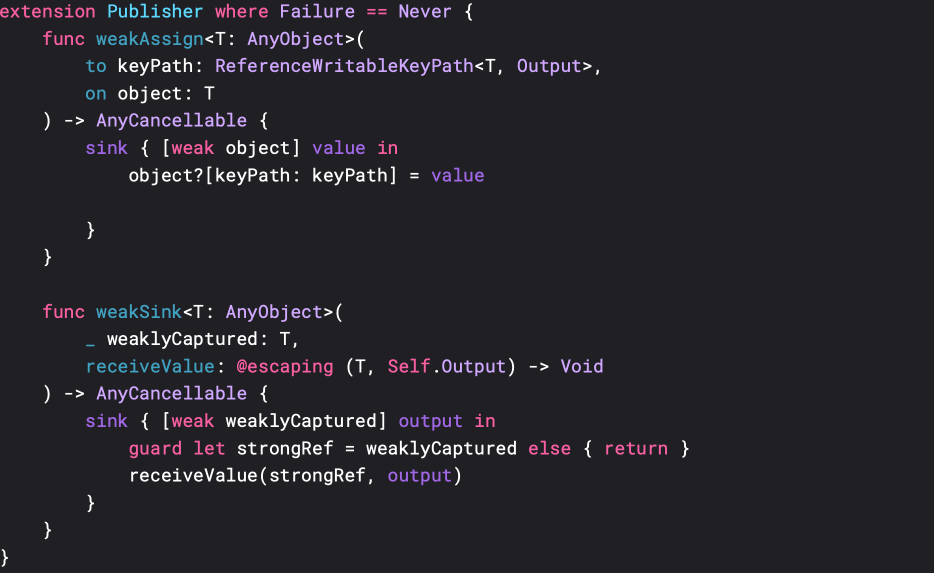
These extensions absolve us of the responsibility to do the weak self – guard let the self dance every time we do a sink function which makes them super helpful! Note that you can only use these extensions if the Failure type of the Publisher is Never. This is perfect for our case since the PassthroughSubject has a Failure type of Never. Still, when that isn’t the case, you must handle the error using the operators that enable that functionality (for example, catch or replaceError). You can use them like this:
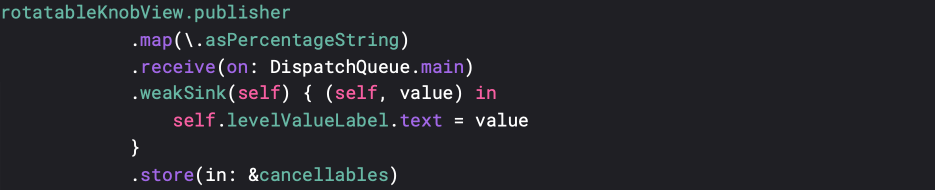
And the assign version looks like this:

Setting a default value for the knob
Now that we have done all of our work with relaying the values to the base view, we have one more adjustment to set a default value for the knob. Since the knob doesn’t know which range the external class is using, we’ll have to normalize the value and send it to the knob. In this case, since the values are from 0 – 100, we need to divide our value by 100, and we’ll get the needed result. On the knob side, we need to add a new variable that holds this default value.

We also need a new Float extension variable that converts the normalized value into the 0 to (3 * π) / 2 range.

We also need a function that updates the rotation of the knob via those values.
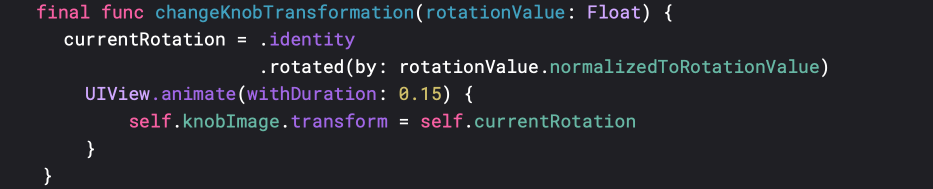
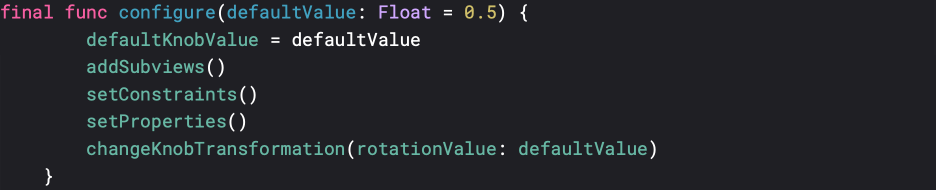
The new knob configure function would now look like this:
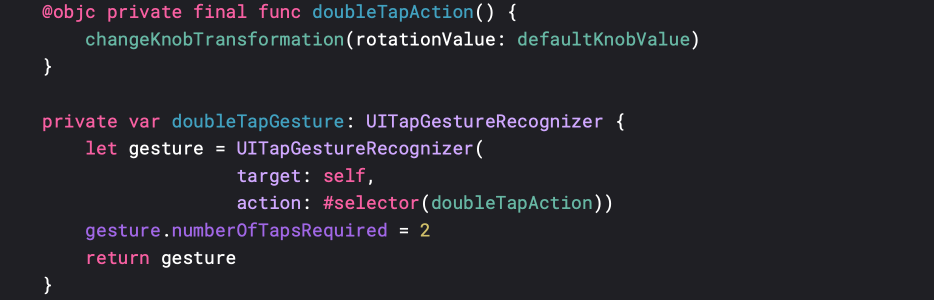
Another functionality that is almost always present with digital knobs is the double tap, which reverts the value to the default value. We can accomplish this by introducing a double tap gesture:
And adding it to the clearOverlayView in the setClearOverlayProperties.

We are all done and have a fully functional rotatable knob control.
Wrap up
This blog combines many Swift language features (and SnapKit) to implement our custom knob control. We’ve used SnapKit for writing constraints, CGAffineTransform for rotation purposes, Property Wrappers for the rotation clamping, and Combine for relaying the values to the view that implements the knob control. If this is your first time tackling these topics, hopefully, this blog provided you with some insight.
You can also take a look at the code here.
Read also: Top 6 reasons to outsource your software development to Eastern Europe