
As more and more mobile applications are being developed every day, navigation is becoming an increasingly important factor in determining the success of an app. As a result, Android developers must be more precise than ever in designing a user-friendly and intuitive navigation experience. With the introduction of the Navigation Component in Android, developers now have a powerful tool to accomplish this goal.
The Navigation Component is a library in Android Jetpack that provides an easy-to-use and declarative way of handling navigation within an app. It enables developers to define an app’s navigation graph in a single XML file and navigate between different fragments without writing much boilerplate code.
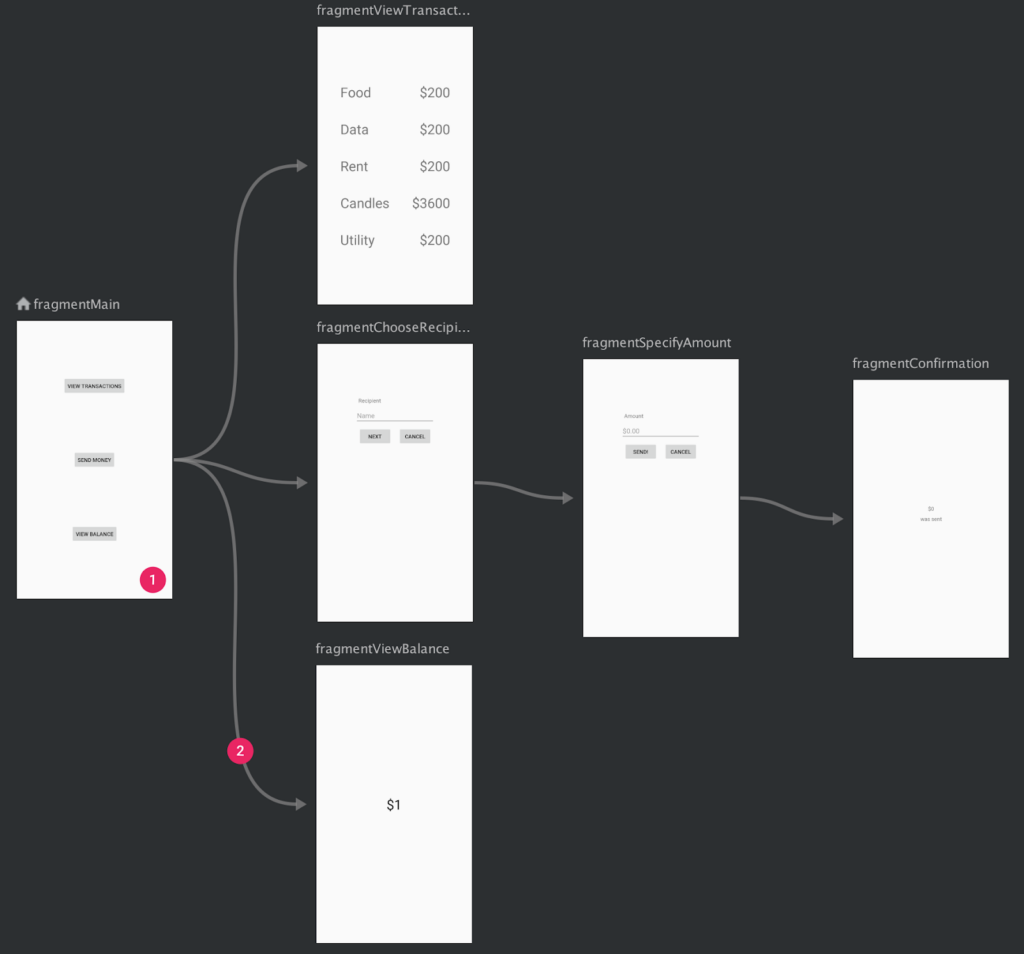
Figure 1. A navigation graph that shows previews of six different destinations that are connected via five actions.
The Navigation Component takes care of the following tasks:
Navigation Graph: Using an XML file helps design and define an app’s navigation structure.
Navigation Actions: It provides a way to define the navigation actions between different destinations in the app, like fragments, activities, or even external URLs.
Back Stack Management: It manages the app’s back stack, ensuring that the user can easily navigate backward in the app.
Animations: It offers a variety of built-in and customizable animations, making it easy to add visual polish to the app’s navigation.
Here’s a closer look at how these features work.
Navigation Graph
The Navigation Graph is the heart of the Navigation Component. It represents the different destinations in the app and the actions that lead to them. For example, a goal can be a fragment, an activity, or an external URL. The Navigation Graph is defined in an XML file in the res/navigation directory of the app.
A fragment tag with an ID attribute represents each destination. The ID is used to identify the destination and to reference it in the navigation actions. The Navigation Graph also defines the initial destination of the app, which is the destination the user sees when the app is launched.
Navigation Actions
Navigation Actions define the possible ways the user can navigate between different destinations in the app. A Navigation Action is characterized by a NavAction tag specifying the source and destination destinations and any arguments that need to be passed to the destination.
A Navigation Action can be triggered by a user action, such as clicking a button or selecting an item from a menu. The Navigation Component takes care of the back stack management, ensuring the user can easily navigate backward in the app.
Back Stack Management
The Navigation Component automatically manages the back stack of the app based on the Navigation Graph and the Navigation Actions. The previous destination is pushed onto the back stack when the user navigates to a new destination. Likewise, the last destination is popped from the back stack when the user navigates back.
For example, the back stack can be manipulated programmatically by adding or removing destinations based on user actions. The Navigation Component also provides a way to navigate up in the app’s hierarchy, taking the user to the highest parent destination in the navigation graph.
Animations
The Navigation Component offers a variety of built-in and customizable animations to add visual polish to the app’s navigation. The animations can be specified for each Navigation Action, allowing for a unique animation for each transition in the app.
The Navigation Component also provides a way to customize how the destinations are entered and exited, making it easy to create a consistent visual style throughout the app.
Setup
To include Navigation support in your project, add the following dependencies to your app’s build.gradle file:
val nav_version = "2.5.3"
// Kotlin
  implementation("androidx.navigation:navigation-fragment-ktx:$nav_version")
  implementation("androidx.navigation:navigation-ui-ktx:$nav_version")
// Jetpack Compose Integration
  implementation("androidx.navigation:navigation-compose:$nav_version")
Create Navigation Graph
To add a navigation graph to your project, do the following:
- In the Project window, right-click on the res directory and select New > Android Resource File. The New Resource File dialog appears.
- Type a name in the File name field, such as “nav_graph”
3. Select Navigation from the Resource type drop-down list, and then click OK
When you add your first navigation graph, Android Studio creates a navigation resource directory within the res directory. This directory contains your navigation graph resource file (nav_graph.xml, for example).
Navigation Editor
After adding a graph, Android Studio opens the graph in the Navigation Editor. In the Navigation Editor, you can visually edit navigation graphs or directly edit the underlying XML.
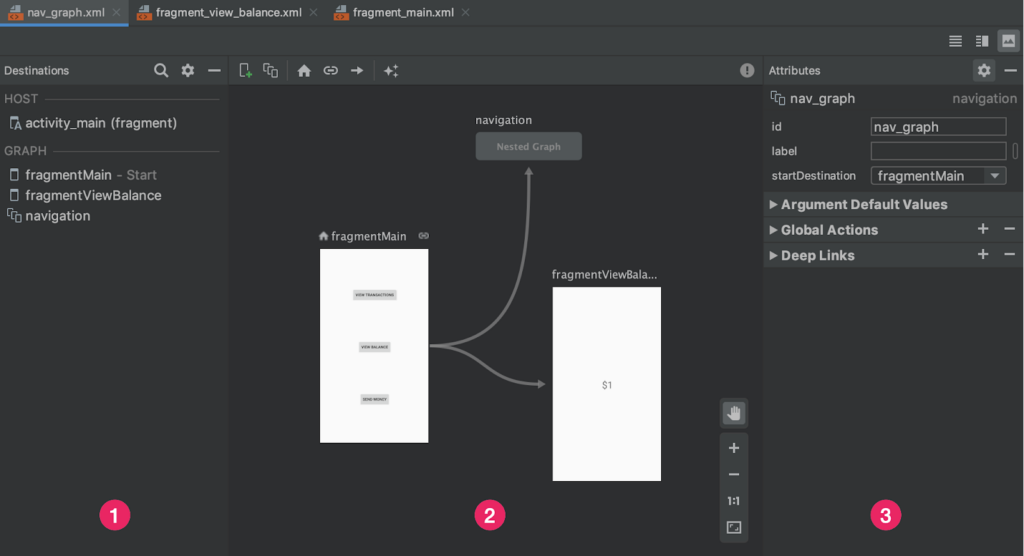
Figure 2. The Navigation Editor
- Destinations panel: Lists your navigation host and all destinations currently in the Graph Editor.
- Graph Editor: Contains a visual representation of your navigation graph. You can switch between Design view and the underlying XML representation in the Text view.
- Attributes: Shows attributes for the currently-selected item in the navigation graph.
<?xml version="1.0" encoding="utf-8"?>
<navigation xmlns:android="http://schemas.android.com/apk/res/android"
            xmlns:app="http://schemas.android.com/apk/res-auto"
            android:id="@+id/nav_graph">
</navigation>
The <navigation> element is the root element of a navigation graph. As you add destinations and connecting actions to your graph, you can see the corresponding <destination> and <action> elements here as child elements. If you have nested graphs, they appear as child <navigation> elements.
Add a nav host to an activity
<?xml version="1.0" encoding="utf-8"?>
<androidx.constraintlayout.widget.ConstraintLayout
    xmlns:android="http://schemas.android.com/apk/res/android"
    xmlns:app="http://schemas.android.com/apk/res-auto"
    xmlns:tools="http://schemas.android.com/tools"
    android:layout_width="match_parent"
    android:layout_height="match_parent"
    tools:context=".MainActivity">

    <androidx.fragment.app.FragmentContainerView
        android:id="@+id/nav_host_fragment"
        android:name="androidx.navigation.fragment.NavHostFragment"
        android:layout_width="0dp"
        android:layout_height="0dp"
        app:layout_constraintLeft_toLeftOf="parent"
        app:layout_constraintRight_toRightOf="parent"
        app:layout_constraintTop_toTopOf="parent"
        app:layout_constraintBottom_toBottomOf="parent"
        app:defaultNavHost="true"
        app:navGraph="@navigation/nav_graph" />


</androidx.constraintlayout.widget.ConstraintLayout>
Note the following:
- The android:name attribute contains the class name of your NavHost implementation.
- The app:navGraph attribute associates the NavHostFragment with a navigation graph. The navigation graph specifies all of the destinations in this NavHostFragment to which users can navigate.
- The app:defaultNavHost=”true” attribute ensures that your NavHostFragment intercepts the system Back button. Note that only one NavHost can be the default. If you have multiple hosts in the same layout (two-pane layouts, for example), be sure to specify only one default NavHost.
Add destination to the navigation graph
You can create a destination from an existing fragment or activity. You can also use the Navigation Editor to create a new destination or create a placeholder to later replace with a fragment or activity.
In this example, let’s create a new destination. To add a new destination using the Navigation Editor, do the following:
- In the Navigation Editor, click the New Destination icon
 , and then click Create new destination.
 - In the New Android Component dialog that appears, create your fragment.
 , and then click Create new destination.
Back in the Navigation Editor, notice that Android Studio has added this destination to the graph.
Anatomy of destination
Click on a destination to select it, and note the following attributes in the Attributes panel:
- The Type field indicates whether the destination is implemented as a fragment, activity, or other custom class in your source code.
- The Label field contains the user-readable name of the destination. This might be surfaced to the UI—for example, if you connect the NavGraph to a Toolbar using setupWithNavController(). For this reason, it is recommended that you use resource strings for this value.
- The ID field contains the ID of the destination which is used to refer to the destination in code.
- The Class dropdown shows the name of the class that is associated with the destination. You can click this dropdown to change the associated class to another destination type.
Click the Text tab to show the XML view of your navigation graph. The XML contains the same id, name, label, and layout attributes for the destination, as shown below:
<?xml version="1.0" encoding="utf-8"?>
<navigation xmlns:app="http://schemas.android.com/apk/res-auto"
    xmlns:tools="http://schemas.android.com/tools"
    xmlns:android="http://schemas.android.com/apk/res/android"
    app:startDestination="@id/blankFragment">
    <fragment
        android:id="@+id/blankFragment"
        android:name="com.example.cashdog.cashdog.BlankFragment"
        android:label="@string/label_blank"
        tools:layout="@layout/fragment_blank" />
</navigation>
Select screen as start destination
The start destination is the first screen users see when opening your app, and it’s the last screen users see when exiting your app. The Navigation editor uses a house icon  to indicate the start destination.
Once you have all of your destinations in place, you can choose a start destination by doing the following:
- In the Design tab, click on the destination to highlight it.
- Click the Assign start destination button . Alternatively, you can right-click on the destination and click Set as Start Destination.
 . Alternatively, you can right-click on the destination and click Set as Start Destination.
Connect destinations
In the Design tab, hover over the right side of the destination that you want users to navigate from. A circle appears over the right side of the destination, as shown in figure 4.
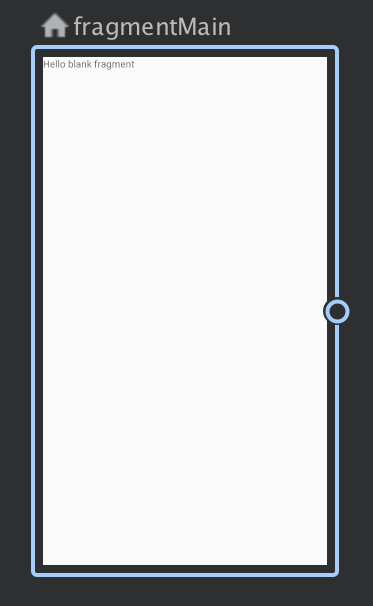
Figure 4. A destination with an action connection circle
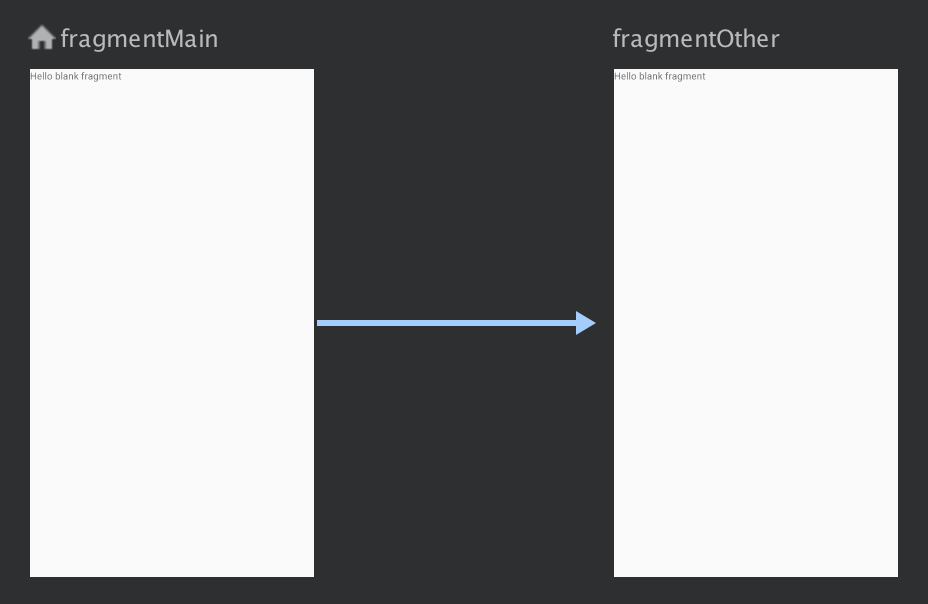
Figure 5. Connecting destinations with an action
Click and drag your cursor over the destination you want users to navigate to, and release. The resulting line between the two destinations represents an action, as shown in figure 5.
Click on the arrow to highlight the action. The following attributes appear in the Attributes panel:
- The Type field contains “Action”.
- The ID field contains the ID for the action.
- The Destination field contains the ID for the destination fragment or activity.
Click the Text tab to toggle to the XML view. An action element is now added to the source destination. The action has an ID and a destination attribute that contains the ID of the next destination, as shown in the example below:
<?xml version="1.0" encoding="utf-8"?>
<navigation xmlns:app="http://schemas.android.com/apk/res-auto"
    xmlns:tools="http://schemas.android.com/tools"
    xmlns:android="http://schemas.android.com/apk/res/android"
    app:startDestination="@id/blankFragment">
    <fragment
        android:id="@+id/blankFragment"
        android:name="com.example.cashdog.cashdog.BlankFragment"
        android:label="@string/label_blank"
        tools:layout="@layout/fragment_blank" >
        <action
            android:id="@+id/action_blankFragment_to_blankFragment2"
            app:destination="@id/blankFragment2" />
    </fragment>
    <fragment
        android:id="@+id/blankFragment2"
        android:name="com.example.cashdog.cashdog.BlankFragment2"
        android:label="@string/label_blank_2"
        tools:layout="@layout/fragment_blank_fragment2" />
</navigation>
In your navigation graph, actions are represented by <action> elements. At a minimum, an action contains its own ID and the ID of the destination to which a user should be taken.
Navigate programmatically to the destination
When creating the NavHostFragment using FragmentContainerView or if manually adding the NavHostFragment to your activity via a FragmentTransaction, attempting to retrieve the NavController in onCreate() of an Activity via Navigation.findNavController(Activity, @IdRes int) will fail. You should retrieve the NavController directly from the NavHostFragment instead.
val navHostFragment =
    supportFragmentManager.findFragmentById(R.id.nav_host_fragment) as NavHostFragment

val navController = navHostFragment.navController

override fun onClick(view: View) {
    val action =
        SpecifyAmountFragmentDirections
            .actionSpecifyAmountFragmentToConfirmationFragment()
    navController.navigate(action)
}
Conclusion
The Navigation Component is a powerful tool for Android developers looking to create a user-friendly and intuitive navigation experience in their app. It provides an easy-to-use and declarative way of designing the navigation structure of an app and navigating between different destinations.
By taking care of tasks like back stack management and animation, the Navigation Component allows developers to focus on creating a great user experience. With its built-in animations and customizable styles, the Navigation Component makes it easy to create a consistent look and feel throughout the app.
Whether you’re a seasoned Android developer or just getting started, the Navigation Component is a tool you should have in your arsenal. It can help you create more successful and user-friendly apps by simplifying navigation and making it easier to manage.
Here are some interesting projects that we worked on, click and get inspired.